HOW TO PREVENT PARCHMENT BRIDGES
FROM BREAKING WHEN CUTTING
A lot of parchment crafters seem to shy away from cut work, and grid
work, for many reasons and one of them is the fear of ending up with a
project full of broken bridges!! Several weeks ago I promised a dear
friend that I would share "my secret" for perforating, and cutting, in
parchment work without breaking bridges. Problem is/was....I became ill
and I forgot I had committed to do that and the question came up again
very recently...and I was reminded I had done a boo-boo in not keeping
my promise to her :(( Sooooooo, here I am and I'm ready (I think!!) to
attempt to put my tried and true 'secret' to paper, and photo, without
totally confusing all of you :))
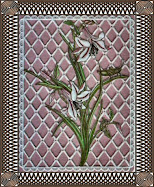
First, here is a photo of an unfinished parchment piece that I have had
for ages and ages....don't really know why I ever even kept it, but sure
glad I did because it's coming in quite handy for this post.....lol

Left click to enlarge the image for better viewing.
The way I have managed to make my bridges VERY thin, and still
not have them break when cutting, is really a matter of 'focus' when you
do any cutting on parchment. Slow down and take your time when cutting
AND you must learn to 'look around' the area you want to cut next!!
Let's follow the areas I have marked on the photo above.
#1: Take your time and look very closely at the UNCUT area that is perforated. Look at the GREEN arrow in the CUT
area. To avoid breaking parchment bridges (bridges are the thin,
perforated strips of parchment that are left after the cutting is done)
it is very important that you BEGIN cutting a new area (#1 uncut area) on the opposite side of the already cut side of the bridge. **Stop reading now and take a serious look at the #1 area on the photo again**
The first cut you will make on the uncut side of that bridge will be in
the top corner....cut to the bottom and you will now have a bridge that
is totally cut away from the parchment paper....now, it is safe to
finish cutting the remaining perforations, in that area, away.
#2: Let's have a look at area #2. I have marked it with GREEN,
once again, but look at the whole area and you would then make your
decision as to where to begin cutting that area. This whole process is
basically simply changing your cutting habits to looking around the
whole area close to where you will cut and identify where the bridges
are that are already cut on one side. Now, be very careful with area #2
because there are two separate areas that need to be cut here!!
#3: Take your time and look around area #3. Following my 'secret
rules', decide where you will begin cutting the parchment paper out of
that area....without breaking the bridge.
#4: Repeat the first three steps throughout your parchment project and
it will be a very, very rare occasion that you will ever have a broken
bridge again.
Now, you ask.....how and why does this keep the bridges from breaking??
All those little pieces of solid parchment paper that we cut away from
the bridges are the foundation to that particular space. They are the
strength in that little space, soooo, if we leave the strength there,
and cut the weak parts first (the bridge itself), as we are cutting the
bridge, the strong part of the area is holding the bridge from moving or
flipping up/down while we cut. The bridge remains safe and sound and
you can now proceed with cutting the remainder of the parchment paper
away from all the other sides in that particular space.
If my tutorial is still confusing to you, just grab some scrap parchment
and make a practice lattice area (a tick-tack-toe area without the x's
and o's!!) and emboss the straight lines of the lattice in any thickness
you wish. Now, begin cutting following the instructions!!!! No, no,
no....don't start screaming.....it'll be just fine.....you'll see :))
**Enlarge the photo above and print it out. Place it close by, for easy reference, while doing your scrap 'practice' work!!** Thanks, Judith Maslen, for the suggestion.
**Enlarge the photo above and print it out. Place it close by, for easy reference, while doing your scrap 'practice' work!!** Thanks, Judith Maslen, for the suggestion.
Oh....and try not to get frustrated because, after all, the Golden Rule in parchment craft is what?? PRACTICE, PRACTICE, PRACTICE!!!!!!
Anyone
with questions...please ask in the comment box and I'll answer there, as
well. That way everyone will benefit from all the questions and
answers :))
Happy Parching,
Vickie
Vickie


Vickie bardzo dziękuję za tutorial i dobre rady :)
ReplyDeleteEwarost....thanks very much for your kind comment!! I hope the tutorial will make it a bit easier to make parchment/pergamano bridges that won't break as easily. :)
ReplyDeleteI am so happy to have found you. I have been doing a lot of searching for parchment tools and items online without much luck. I am new to parchment crafting and just recently purchased a starter kit. I have found several companies in the UK , but having trouble finding companies in the US that sell parchment and pergamano products..
ReplyDeleteHi Barbara....I am so happy you found me too!!! lol Seriously, I know how very difficult it is to find anything at all related to the art of parchment craft/pergamano here in the states. Now, where in the US are you located? I ask the question because it will better assist me in the links I will send to you if I know which vendor location would be closer to you......or are you in Canada? Please feel free to contact me with your information at my business email: papercrazysplace@gmail.com
DeleteHugs,
Vickie